I’ll never forget the moment I snapped the delicate chain of my favorite necklace while trying to put it on. That sinking feeling of helplessness hit me hard. For years, I believed that jewelry repair was something only professionals could do — a task reserved for experts and expensive shops. But then I had a lightbulb moment: I could learn how to repair and re-string my jewelry myself, saving money and gaining confidence in my skills. This realization transformed my approach and made me value my jewelry even more.
Why Jewelry Repair & Re-stringing Matter More Than Ever
In today’s fast-paced world, jewelry is more than just adornment — it’s a reflection of our personality, memories, and milestones. However, over time, even the most cherished pieces can suffer damage or wear, leading to frustration and loss of trust in their longevity. Repairing or re-stringing jewelry might seem daunting, especially if you’ve had a bad experience or made costly mistakes early on. But here’s the truth: with the right tips and techniques, you can restore your jewelry’s beauty and confidence without breaking the bank.
Have you ever faced a broken chain or a loose clasp and wondered if it was worth fixing?
You’re not alone. Many people hesitate to repair their jewelry because of fear of making things worse or simply because they think it’s too complicated. I used to think the same until I learned that the key is understanding the basics and knowing where to seek expert guidance. Trust me, mastering simple repairs can save you money, extend the life of your favorite pieces, and even boost your confidence when handling jewelry repairs yourself.
Early on, I made the mistake of trying to re-string a necklace without proper tools, which led to more damage. That mistake taught me the importance of proper techniques and patience. If you’re eager to avoid similar pitfalls, I recommend exploring trusted resources like expert jewelry repair and re-stringing tips. Now, I’ll walk you through some essential tips to get started on your jewelry repair journey, helping you build confidence and trust in your skills.
Gather the Right Tools Before You Start
Think of repairing jewelry like fixing a bicycle — you need the right tools for each task. For basic repairs, invest in a jewelry plier set, a needle-nose tool, a small flat-head screwdriver, and a jeweler’s magnifier. When re-stringing necklaces, a beading needle and quality beading wire are essential. I once tried to re-string a fragile pearl necklace with just thread and no needle, which led to tangled beads and frustration. Proper tools make the process smoother and more precise, preventing damage and building your confidence.
Learn Basic Techniques Step-by-Step
Fixing a Broken Chain
Start by examining the chain to identify the break point. Use small pliers to open a jump ring near the break. Carefully remove the damaged section or open the jump ring to reconnect the chain. Close the jump ring tightly using your pliers, ensuring no gaps. I remember fixing a delicate silver chain this way — it took patience, but the chain looked almost new afterward. This simple technique is the foundation for more complex repairs.
Re-Stringing a Necklace
Lay out your beads in order, then cut a length of beading wire about 2 inches longer than the original string. Thread a beading needle onto the wire if needed. String your beads carefully, maintaining the pattern. Use a crimp bead to secure the clasp and the other end of the string. Use crimping pliers to flatten the crimp bead firmly. I once re-strung a vintage pendant necklace, focusing on keeping the beads snug but not tight, which preserved its charm and durability. Practice patience here — rushing will lead to uneven tension or bead damage.
Secure Clasps and Extenders Properly
Clasp repair is like fixing a latch on a gate — you want it to be secure but easy to open. Use a small flat-head screwdriver or pliers to tighten loose clasps or replace broken ones. For extenders, attach new jump rings or crimp beads, ensuring they are closed tightly. I learned this the hard way when my necklace kept falling off because I hadn’t secured the clasp well. Tightening and testing the clasp repeatedly keeps your jewelry secure long-term.
Use the Right Adhesives for Repairs
If you need to fix a broken pendant or secure a gemstone, choose a jewelry-specific adhesive. Apply a tiny amount with a toothpick, avoiding excess that can seep out. Wait for the recommended drying time before wearing. I once glued a gemstone back into its setting, and it held perfectly — but only because I used the right glue and patience. This step can save a piece from permanent damage if done carefully.
Practice Patience and Precision
Remember, jewelry repair is like a delicate dance — rushing can cause mistakes. Work in a well-lit space, hold your tools steadily, and take your time. Each small step builds your skill and confidence. My first re-stringing attempt was messy — beads were uneven, and the knotting was inconsistent — but I learned from my mistakes. Over time, your techniques will improve, and you’ll trust your ability to maintain your jewelry’s beauty and value.
For more advanced tips and professional guidance, explore resources like expert jewelry repair and re-stringing tips. With patience and practice, you’ll turn DIY repair into a rewarding skill that preserves your jewelry collection for years to come.
Many enthusiasts dive into jewelry repair with a limited understanding, believing that standard techniques or common advice are foolproof. However, even seasoned DIYers often fall prey to misconceptions that can lead to costly mistakes or damaged pieces. Let’s dig deeper into some of the most overlooked nuances and myths that can trip you up in jewelry repair and re-stringing.
Myth 1: All Jewelry Repairs Are Similar
One of the biggest misconceptions is that repairing different types of jewelry—be it gold, silver, or beaded necklaces—requires the same approach. In reality, each material and construction demands tailored techniques. For example, soft metals like gold can be soldered or fixed with specific adhesives, while silver may require different tools or cleaning methods. Beaded necklaces, especially those with delicate or vintage beads, need gentle handling and specialized beading wire. Ignoring these nuances can cause further damage, so understanding the specific needs of each piece is crucial.
Myth 2: Using the Cheapest Tools or Materials Will Save Money
While it might seem cost-effective to buy cheap tools or adhesives, this often backfires. Low-quality pliers, for instance, can slip and cause accidental damage, while inferior adhesives may not hold or could discolor your jewelry. Professional-grade tools and jewelry-specific adhesives might be more expensive initially but will ensure precision and durability, ultimately saving you money and frustration in the long run. For advanced repairs, investing in proper tools and consulting expert resources like expert tips can make all the difference.
Oops! The Trap of Over-Repairing
Many DIY enthusiasts fall into the trap of over-repairing or over-embellishing simple fixes, which can weaken the jewelry or obscure its original beauty. For example, excessively soldering or adding multiple crimps on a delicate necklace can compromise its integrity. Remember, sometimes less is more. Focus on restoring the piece’s original structure and aesthetics rather than overdoing it. This is especially true when re-stringing vintage or fragile jewelry, where maintaining the natural tension and pattern is key to longevity.
What Advanced Techniques Should You Master for Professional-Quality Repairs?
For experienced DIYers, understanding advanced techniques like micro-soldering, precise crimping, or gemstone setting can elevate your repairs from amateur to professional. These skills require patience and practice but significantly improve the quality and trustworthiness of your work. If you want to go beyond basic repairs, exploring resources such as expert advice on re-stringing and appraisal can help sharpen your skills and ensure your jewelry maintains its value and beauty over time.
Remember, mastering these nuances not only protects your jewelry but also builds your confidence as a DIY repair expert. Have you ever fallen into this trap? Let me know in the comments.
Maintaining your jewelry repair toolkit is crucial for ensuring consistent, professional results. I personally recommend investing in high-quality jewelry pliers, specifically precision flat-nose pliers with smooth, rounded tips. These prevent scratching delicate metals and allow for strong, secure closures. Keep your tools clean and dry after each use—wiping them with a soft cloth will avoid tarnish and corrosion, extending their lifespan.
For re-stringing, I use a beading needle that has a fine, flexible tip. This allows me to thread through tiny, fragile beads without damage. Quality beading wire, such as Nylon-coated stainless steel, offers flexibility and strength, preventing breakage over time. Additionally, I keep a crimping tool with different crimping sizes; this helps secure clasps firmly and evenly, which is essential for long-term durability.
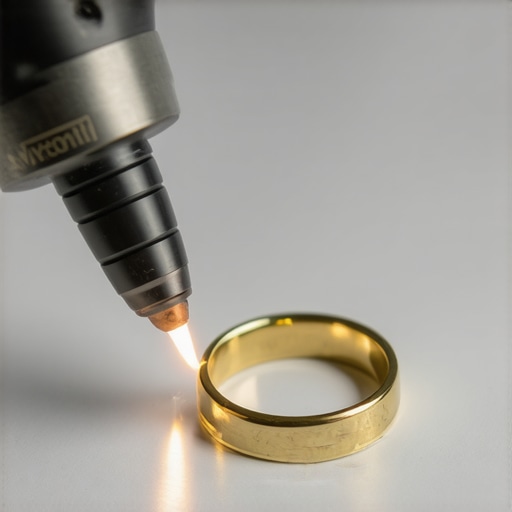
Regular maintenance of your tools involves sharpening or replacing worn parts. For instance, replace worn-out pliers tips to avoid slipping during repairs. A professional-grade micro-soldering kit can be a game-changer if you venture into more advanced repairs, like fixing broken gold or silver pieces. These tools allow for precise soldering, which is essential for seamless repairs that retain jewelry’s value.
How do I maintain my jewelry repair tools over time?
To keep your tools in top shape, regularly clean them with a soft cloth and a gentle solvent if needed. Store them in a dedicated toolbox, preferably with compartments to prevent damage. For cutting tools, occasional sharpening or replacing blades ensures clean cuts and reduces the risk of slipping. Also, lubricate moving parts with a tiny drop of light oil—this prevents rust and ensures smooth operation during repairs.
Looking ahead, I predict that the trend towards automated and digital tools in jewelry repair will grow. Devices like digital magnifiers and ultrasound cleaners will become more accessible for DIY enthusiasts, making maintenance even easier. Mastering basic tools now sets a solid foundation for embracing these future innovations, allowing you to scale your repair skills with confidence.
If you’re ready to elevate your skills, I highly recommend trying out a professional beading wire and practicing precise crimping techniques. These small upgrades can significantly improve the longevity and appearance of your repaired jewelry, building trust in your craftsmanship every step of the way.
The Hardest Lesson I Learned About Jewelry Repair & Re-stringing
One of my most profound realizations was that rushing through repairs often leads to mistakes. Patience is key, especially when dealing with fragile beads or delicate metals. I once tried to fix a silver chain without proper tools, only to make it worse. This taught me that understanding and respecting the materials makes all the difference.
3 Myths About Jewelry Repair & Re-stringing That Held Me Back
Myth 1: All jewelry can be fixed with the same techniques. The truth is, materials like gold, silver, and beaded necklaces each require specific approaches. Myth 2: Cheap tools are enough to do a good job. Actually, investing in quality tools results in better, more durable repairs. Myth 3: Over-repairing enhances jewelry. Sometimes, less is more—overdoing it can weaken the piece rather than strengthen it.
What Experts Won’t Tell You About Jewelry Repair & Re-stringing
Many professional secrets involve understanding the nuances of different materials and knowing when to seek expert help. For example, micro-soldering requires skills that go beyond basic repairs, and choosing the right adhesive can make or break a fix. Learning these details can elevate your DIY skills and preserve your jewelry’s value.
Curated Recommendations for Jewelry Repair & Re-stringing
My Essential Toolkit for Jewelry Repair includes precision flat-nose pliers, a beading needle, and quality beading wire—these tools are my trusted companions for every project. I also recommend the book Jewelry Making & Repair by Carol Wilson, which offers practical techniques with step-by-step guidance. For advanced repairs, exploring professional resources on expert tips has significantly improved my results.
Your Turn to Shine with Jewelry Repair & Re-stringing
Remember, every piece of jewelry has a story, and your ability to repair and re-string them is a gift you can nurture. Embrace patience, invest in quality tools, and keep learning—your confidence will grow with each successful repair. Don’t hesitate to try new techniques and seek out expert advice when needed. Your jewelry deserves the best care, and so do you.
What’s the one jewelry repair project you’ve been putting off? Let me know below, and let’s share tips to make it easier!

![5 Hidden Signs Your Ring Prongs Are Failing [2026 Checklist]](https://jewelryfixpro.com/wp-content/uploads/2026/02/5-Hidden-Signs-Your-Ring-Prongs-Are-Failing-2026-Checklist.jpeg)
![3 Subtle Signs Your Diamond Is About to Fall Out [2026]](https://jewelryfixpro.com/wp-content/uploads/2026/02/3-Subtle-Signs-Your-Diamond-Is-About-to-Fall-Out-2026.jpeg)